Performance Benchmarks: Setup and Configuration
AdvisorEngine partners with Morningstar to provide widely-used industry standard comparative benchmarks.
Authorized persons can administer their comparative performance benchmarks by navigating to Grow Practice > Customization > Performance.
All firms are assigned three starter benchmarks as their first Total Performance benchmarks. These are the US Large Cap, Developed World Equity Excluding US, and US Aggregate Bond Indecies.
Advisors can define any number of benchmarks.
- Up to three can be designated as default Total Performance benchmarks. These appear in all locations that Performance data is is displayed, including the client profile Performance tab, the Client Portal, and Report Package PDFs if configured.
- Advisors can also assign one benchmark to each Model. The benchmark will appear for any Account, Client, or Household where the Household is using the Model.
- Advisors can also assign one additional benchmark directly to any Household.
Any overlap in the above configuration will be discarded in the final display; a benchmark will not appear twice in any reporting.
Enabling Benchmarks
Benchmarks are managed from Grow Practice > Customization > Performance. At the top right of the landing screen is the control. If set to the Disabled position, benchmark displays on are fully suppressed on the client profile Performance tab, the Client Portal, and Report Package PDFs.
Example of enabled vs disabled on the Performance Charts report for a sample account:

Performance Settings
Click in the upper right to access the following controls:
Start performance on date of first purchase
The system won’t start to calculate performance history for new accounts until the first day it encounters a Buy transaction. If disabled, performance starts on account open date.
Display Benchmarks on Client Portal and Report Packages
If Benchmarking is enabled and this control is also enabled, benchmarking performance data will show on the client portal and also on report packages. This can be repressed in individual report packages if desired.
Default Time Periods
This section is also used to control default performance periods available in the Client Portal, Portfolio Management Platform, and Report Packager. See Setting Default Performance Periods for more details.
Viewing Existing Benchmarks
Benchmarks are managed from Grow Practice > Customization > Performance. All defined benchmarks are displayed, starting with the designated Total Performance benchmarks.
Other benchmarks that have been created are displayed beneath. These can be assigned to Models, assigned to Households, or reserved for future use. They can also be swapped in to replace existing Total Performance benchmarks.

Adding New Benchmarks
New benchmarks can be defined by clicking in the upper left. A new dialog opens to lead you through the process.

1. Assign to Slot
Use the Assign to Slot drop-down to indicate if this new benchmark will occupy one of the three available Total Performance slots or be left unassigned. Benchmarks can be rearranged at any time. If you select a Total Performance slot, any existing benchmark in that slot will be set to unassigned.
2. Name the Benchmark
Enter an appropriately descriptive title in the Benchmark Name field.
3. Add Components
A benchmark is a fixed-blend basket of components. There can be just one component, or any number of components you choose. Most benchmarks consist of one or more classic industry indexes, but you also have the option to use any extant security as a benchmark component.
Click to locate specific desired components. Click when finished.
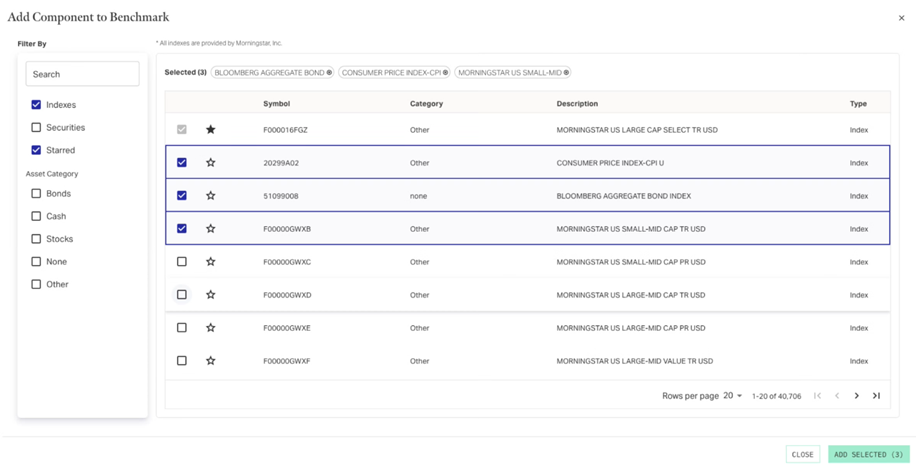
- Click the checkbox on any component line to add it to the queue of components to add. The selected component appears at the top and can be removed from there if needed.
- Use the Search box to look for a specific component. The table automatically filters as you type.
- Use the Filter checkboxes to narrow the table. Selecting multiple checkboxes uses OR logic, displaying results that fit any of the checked items.
- Click the star
 on any line to favorite the component for later use. The Starred filter can be used to view all favorited items.
4. Set the Weighting
The selected component(s) appear in the selection area with the percentage weighting of each. If you have only one component, this will be set to 100% and you can move on to the next section.
For benchmarks with multiple components, enter the percent weighting desired for each component. The end total must be 100%.
5. Save Benchmark
When all settings are complete, click to continue. You are asked to review your changes. If they are correct, click . You are returned to the Grow Practice > Customization > Performance tab with all changes implemented.
Modifying or Deleting Benchmarks
Use the  control at the end of a benchmark line to reassign, edit, or delete a benchmark.
Assigning Benchmarks
To move an unassigned benchmark to a Total Performance slot, click > Assign and select the Total Performance slot to put the Unassigned benchmark.
Editing Benchmarks
To change any settings of a benchmark, click > Edit on the benchmark line. The Edit Benchmark dialog opens. All the settings are identical to adding a benchmark the first time. See above if needed for editing options.
Deleting Benchmarks
Any benchmark can be deleted by clicking > Delete on the right side of the benchmark line. You will be asked to confirm the deletion. This cannot be undone.