Sending a Mass Email through Microsoft Word/Outlook
By using the Grid Export feature of AdvisorEngine CRM combined with the Mail Merge feature of Microsoft Word and Outlook, it is possible to send a mass mailing to alternate contact lists or with more specific formatting than allowed strictly within AE CRM.
Users of the Microsoft 365 integration can Email through Outlook Online without needing this workaround.
To do this, you’ll perform the following basic steps:
- Create and export a Record Grid containing data you need for your mail merge (including the email addresses of all your recipients).
- Load the exported data into Microsoft Word as a mail merge dataset.
- Draft your email in Microsoft Word.
- Merge and send the final communication from Word through your current Outlook profile.
Full details for each part of the process are outlined below.
Part 1: Creating a Distribution List
- Navigate to the Record Workspace.
- Using Searches or Filters, create a Grid containing the Records you want to receive the mailing.
- Use the Column Chooser to add the email type you want to contact. Common options include Email Record, Email Primary Person 1, Email Primary Person 2. Note that with this method you can only send to one address per Record.
- If there are any fields you wish to use as merge data in your message, add those columns to the Grid as well.
- Use Grid Export to save the contents of the Grid to CSV.
Part 2: Starting an Email Merge in Microsoft Word
- Open a blank document in Word.
- In the Mailings tab, click .
- In the Mailings tab, click .
- Navigate to and select the CSV downloaded in Part 1.
Part 3: Drafting Your Email Message
At this point, you are ready to draft your email message in Word. You can also insert any columns you exported from AE CRM as merge fields in your draft by using . Remember, email delivers formatting in a “best effort” manner. It is best to keep styling and formatting simple; your recipients may not see extensive or fancy formatting and images as you intend.
Part 4: Sending Your Message
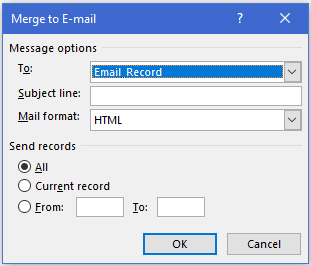
- In the Mailings tab, click .
- Click the drop-down and select the column with the recipient email addresses.
- Enter a Subject Line.
- Click OK. The completed merge is passed to Outlook for sending through your email.

Conclusion
The merged and sent emails are visible in your sent items folder. If you are using the Outlook Add-in with automatic email capture enabled, they are automatically captured to the Records you included.
Related Articles
Sending Mass Emails
Note: Your email integration must be set up before this function is available. See Email and Calendar Setup for instructions on enabling this feature. Select Recipients and Launch the Email Editor Navigate to the Records Workspace. Use the checkboxes ...Sending Single Emails
Note: Your email integration must be set up before this function is available. See Email and Calendar Setup for instructions on enabling this feature. Launching the Email Editor You can begin drafting an individual email from multiple areas of ...Microsoft 365: Outlook Online Add-in Setup
The Microsoft 365 Outlook Online Add-in links the AdvisorEngine CRM email correspondence features to Outlook Online. With this feature enabled, all emails initiated from within AE CRM will open Outlook Online to create and send messages to your ...Microsoft 365: Email Capture Overview and Setup
Once the Microsoft 365 integration is Set up for your User, you can begin capturing emails to AdvisorEngine CRM. When an email is captured, a stored copy of the email and any attachments are placed in the matching CRM Record. The emails will be ...Microsoft 365: Manual Email Capture and Management
Once the Microsoft 365 integration is Set up for your User, you have access to the Email Management Workspace, allowing you to manually capture or manage any mis-captured emails as needed. The Email Mgt. navigation option will appear on the Site ...